RibbonReady user guide
Last updated: 4 November 2026 (version 1.14)
RibbonReady turns one video into a ready-to-play file for every LED ribbon you tick, at each venue's own size, frame rate, length and file type. This guide walks through the whole app, from your first video to blackout zones and the Designer. Click Help › User guide at the top of the app any time to come back here.
Getting started
Install on a Mac
- Download the Mac zip from the download section and double-click it to unzip.
- Drag RibbonReady into your Applications folder. This matters: macOS won't let the app update itself while it runs from Downloads.
- Double-click RibbonReady. The first time, macOS says it can't verify the app. On macOS 15 or later, click Done, open System Settings › Privacy & Security, scroll to the bottom and click Open Anyway next to RibbonReady. On macOS 14 or earlier, right-click the app and choose Open.
You only do step 3 once. If the Open Anyway button isn't there, double-click RibbonReady again first, because it only shows for about an hour. More about this message.
Install on Windows
Download the Windows zip, unzip it and double-click RibbonReady. If a blue box says Windows protected your PC, click More info, then Run anyway.
Activate it
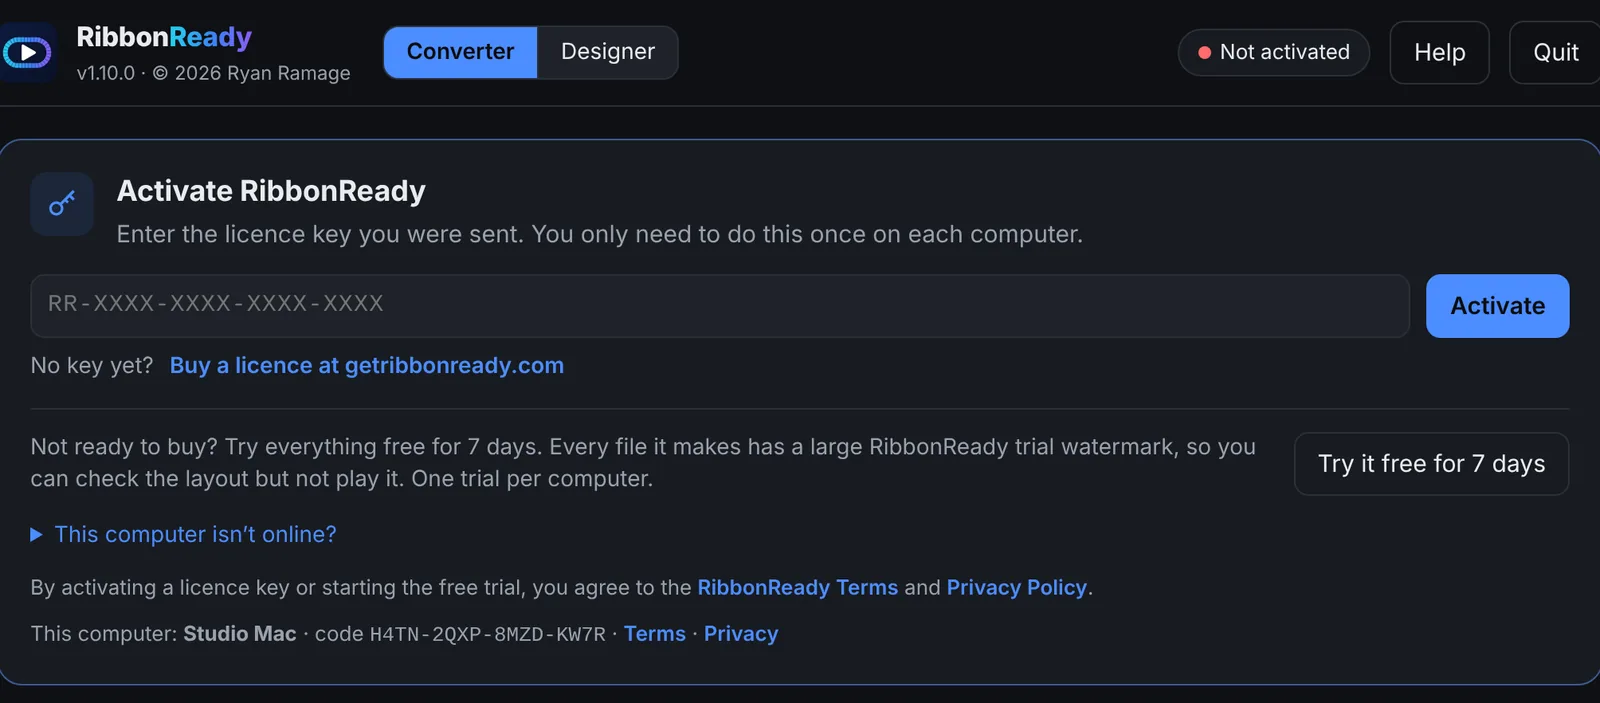
The first time it opens, RibbonReady asks for your licence key. Paste the key from your email and click Activate. You only do this once on each computer.
Not ready to buy? Click Try it free for 7 days. The trial does everything, but every file it makes has a large RibbonReady watermark across it, so you can check the layout but not play it at a game. There's one trial per computer.
The app at a glance
Along the top of the window:
- Converter, Designer, Batch and Test pattern switch between turning a video into ribbon files, designing a sponsor tile from scratch, converting a pile of finished ribbon files in one go (see Batch convert), and making test clips for checking a ribbon (see Test patterns).
- The licence button shows who the app is licensed to, or how long the trial has left. Click it to see your licence.
- An update button appears when a new version is ready (see Updates).
- Help opens a menu: User guide opens this guide in your browser, and Send to support sends us a question with the app's log (see Getting help).
- Quit closes RibbonReady. Closing the window does the same. If videos are still being made, it asks first.
The converter runs top to bottom in five steps: Video, Screens, Settings, Preview and Your files. The button to start is always at the bottom of the window. At the very bottom is Diagnostics, a log of everything the app does, which is handy if something goes wrong (see Getting help).
Making ribbon videos
1. Choose your video
Click Choose video… and pick your video, or paste the full path to it and click Load. RibbonReady shows a thumbnail and the facts it found: size, frame rate, length and so on. The new files are saved in the same folder as your video.
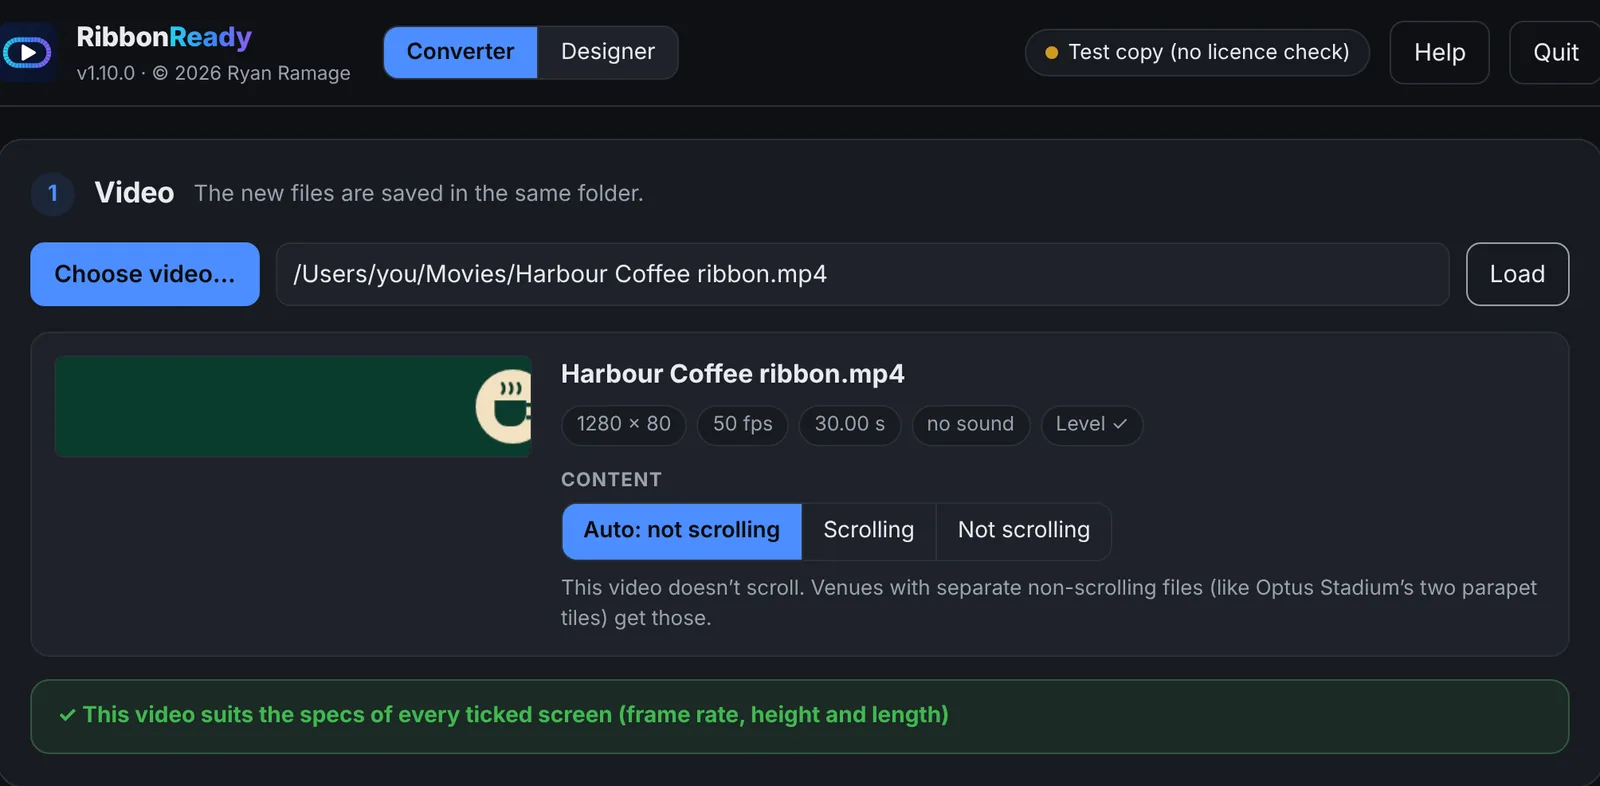
Under the video, Content says whether it scrolls sideways. Auto works it out for you, and the note underneath says what it found, for example scrolls left at about 120 px/s and its edges join seamlessly. Pick Scrolling or Not scrolling if it guessed wrong. This matters at venues like Optus Stadium, which have separate files for scrolling and non-scrolling content.
RibbonReady also checks the video against the screens you tick: frame rate, height and length. If something doesn't match a venue's spec, a warning says what and which screens, so you can decide whether it matters.
If your video repeats a logo along its length and the copies don't sit level, you'll see The repeated logos in this video aren't level. Leave Line up the repeated logos ticked and each copy is moved onto the same rows as the first when the files are made.
2. Tick your screens
The screen list holds every venue's ribbons, sorted into leagues. Click a league tab, then tick the screens you want. Ticking a venue's name ticks all its screens. Use the search box to find a venue or screen by name.
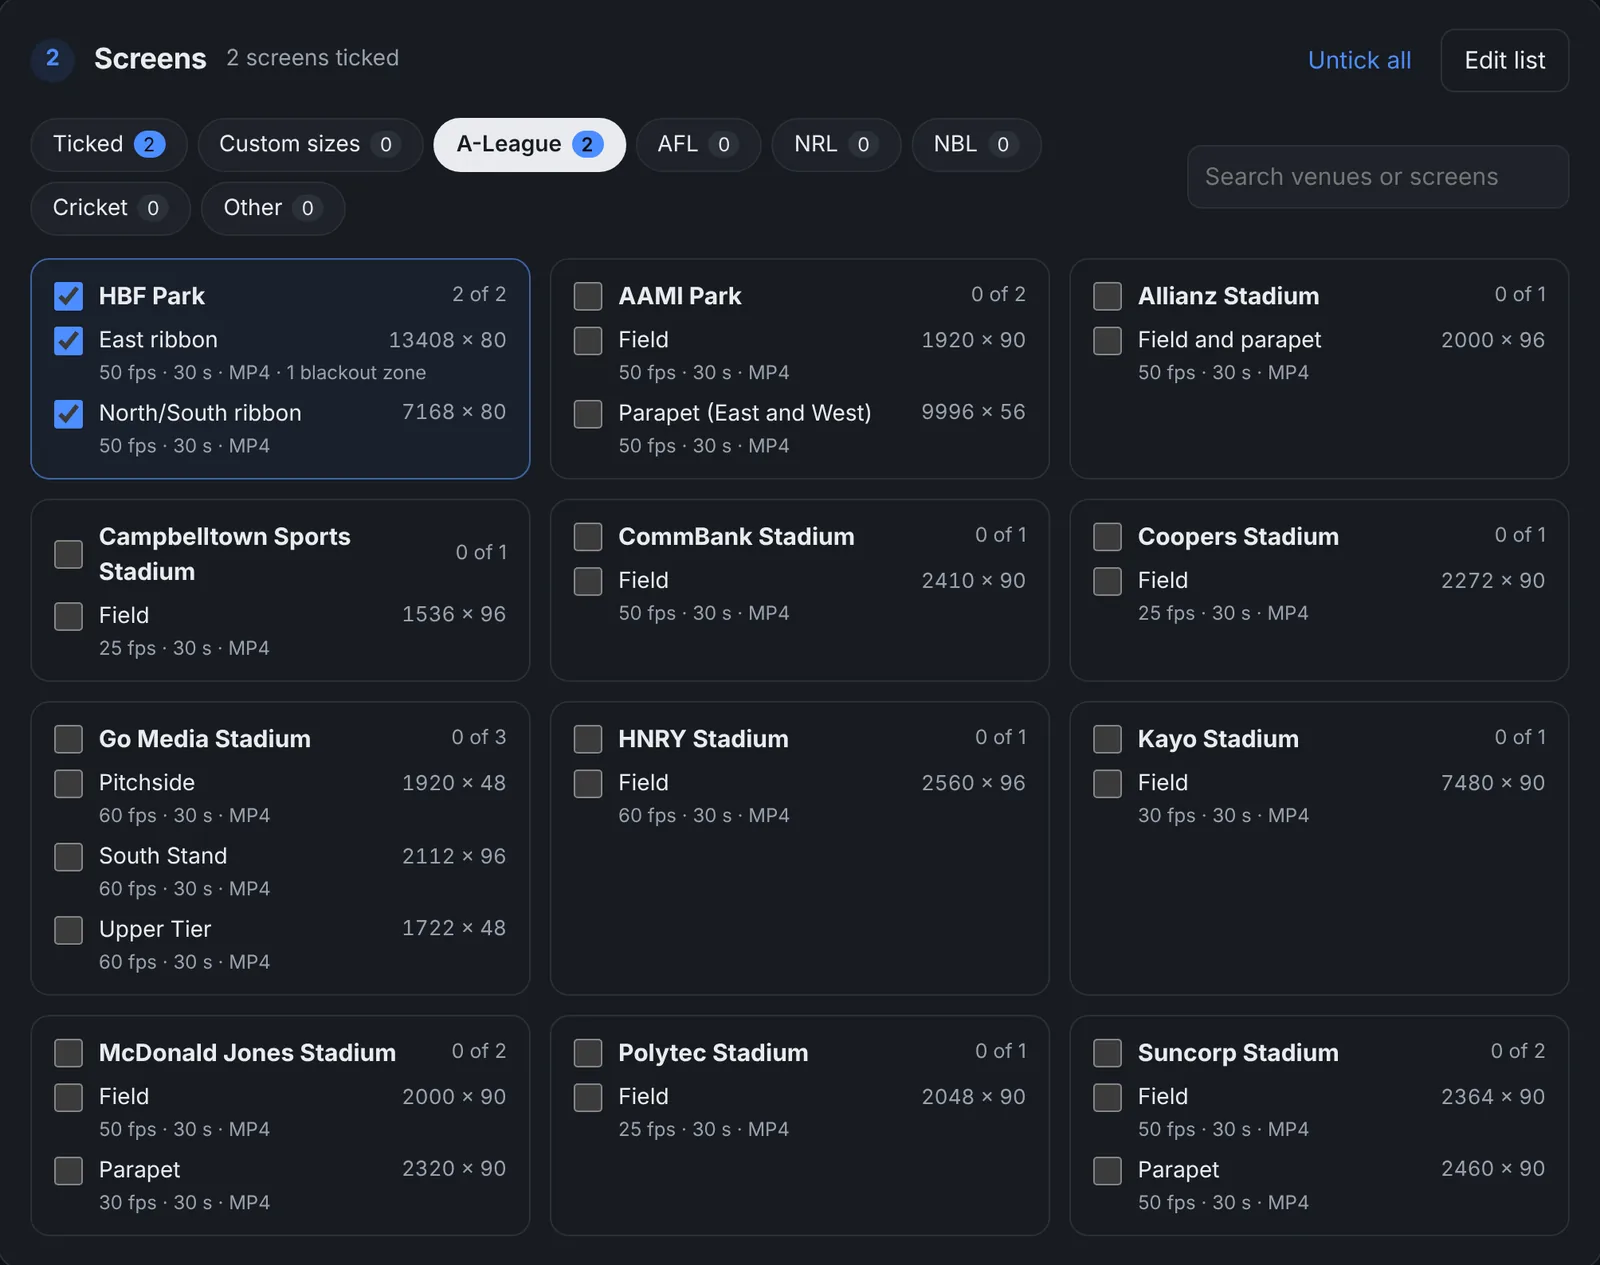
Each screen shows its size and the spec it will be made to: frame rate, length, file type and anything special, like timecode or a blackout zone.
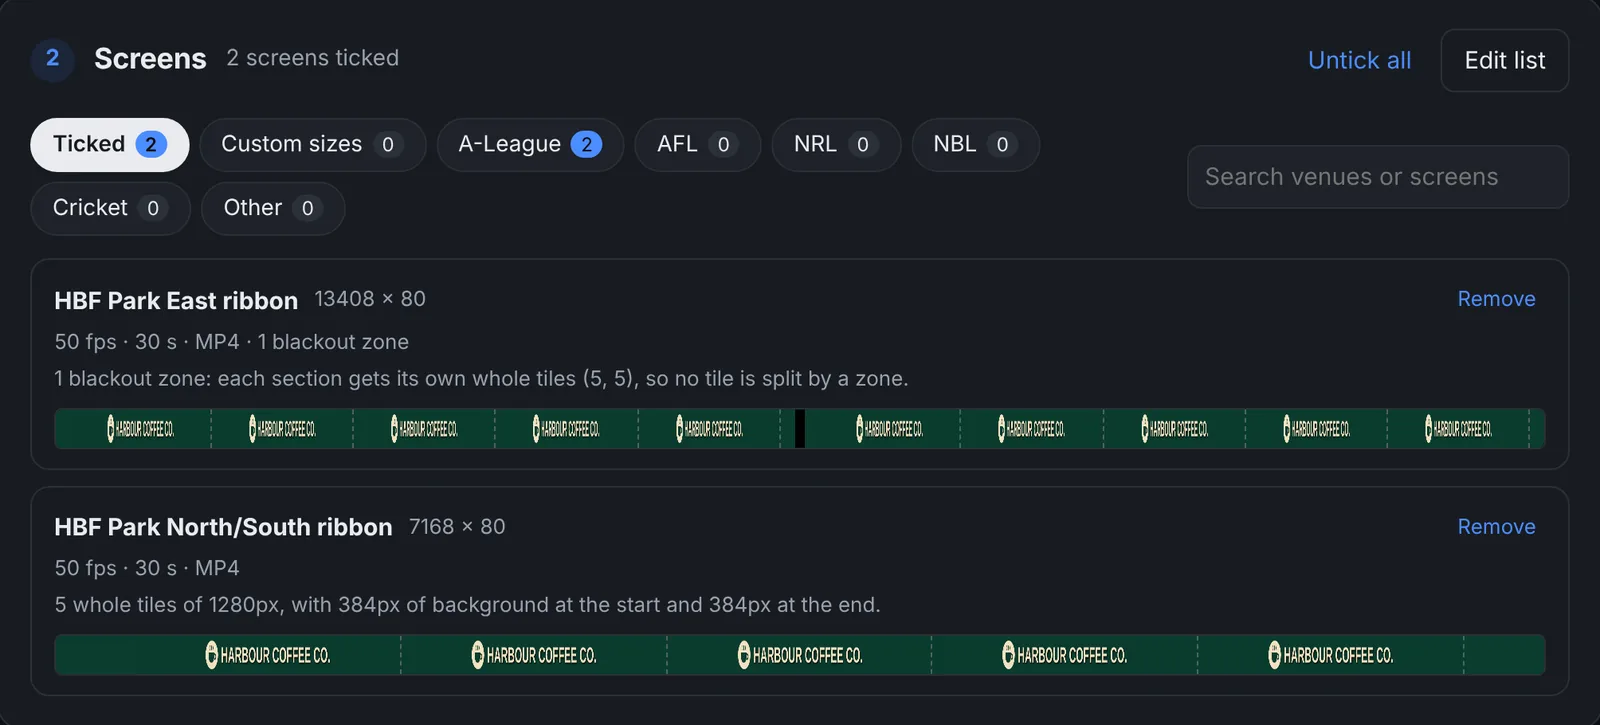
The Ticked tab shows only the screens you've ticked, with a strip under each one showing how your video will be laid out on it. Untick all clears your ticks.
Optus Stadium also lists its whole-ribbon files under its screens: Field 360, Parapet 360 and Parapet 360 (scrolling). Tick one and the tile screens it's made from are ticked too. See Full-length files.
Need a size that isn't in the list? See Custom sizes.
3. Check the settings
The settings start from each venue's spec, so most of the time you can skip this step.
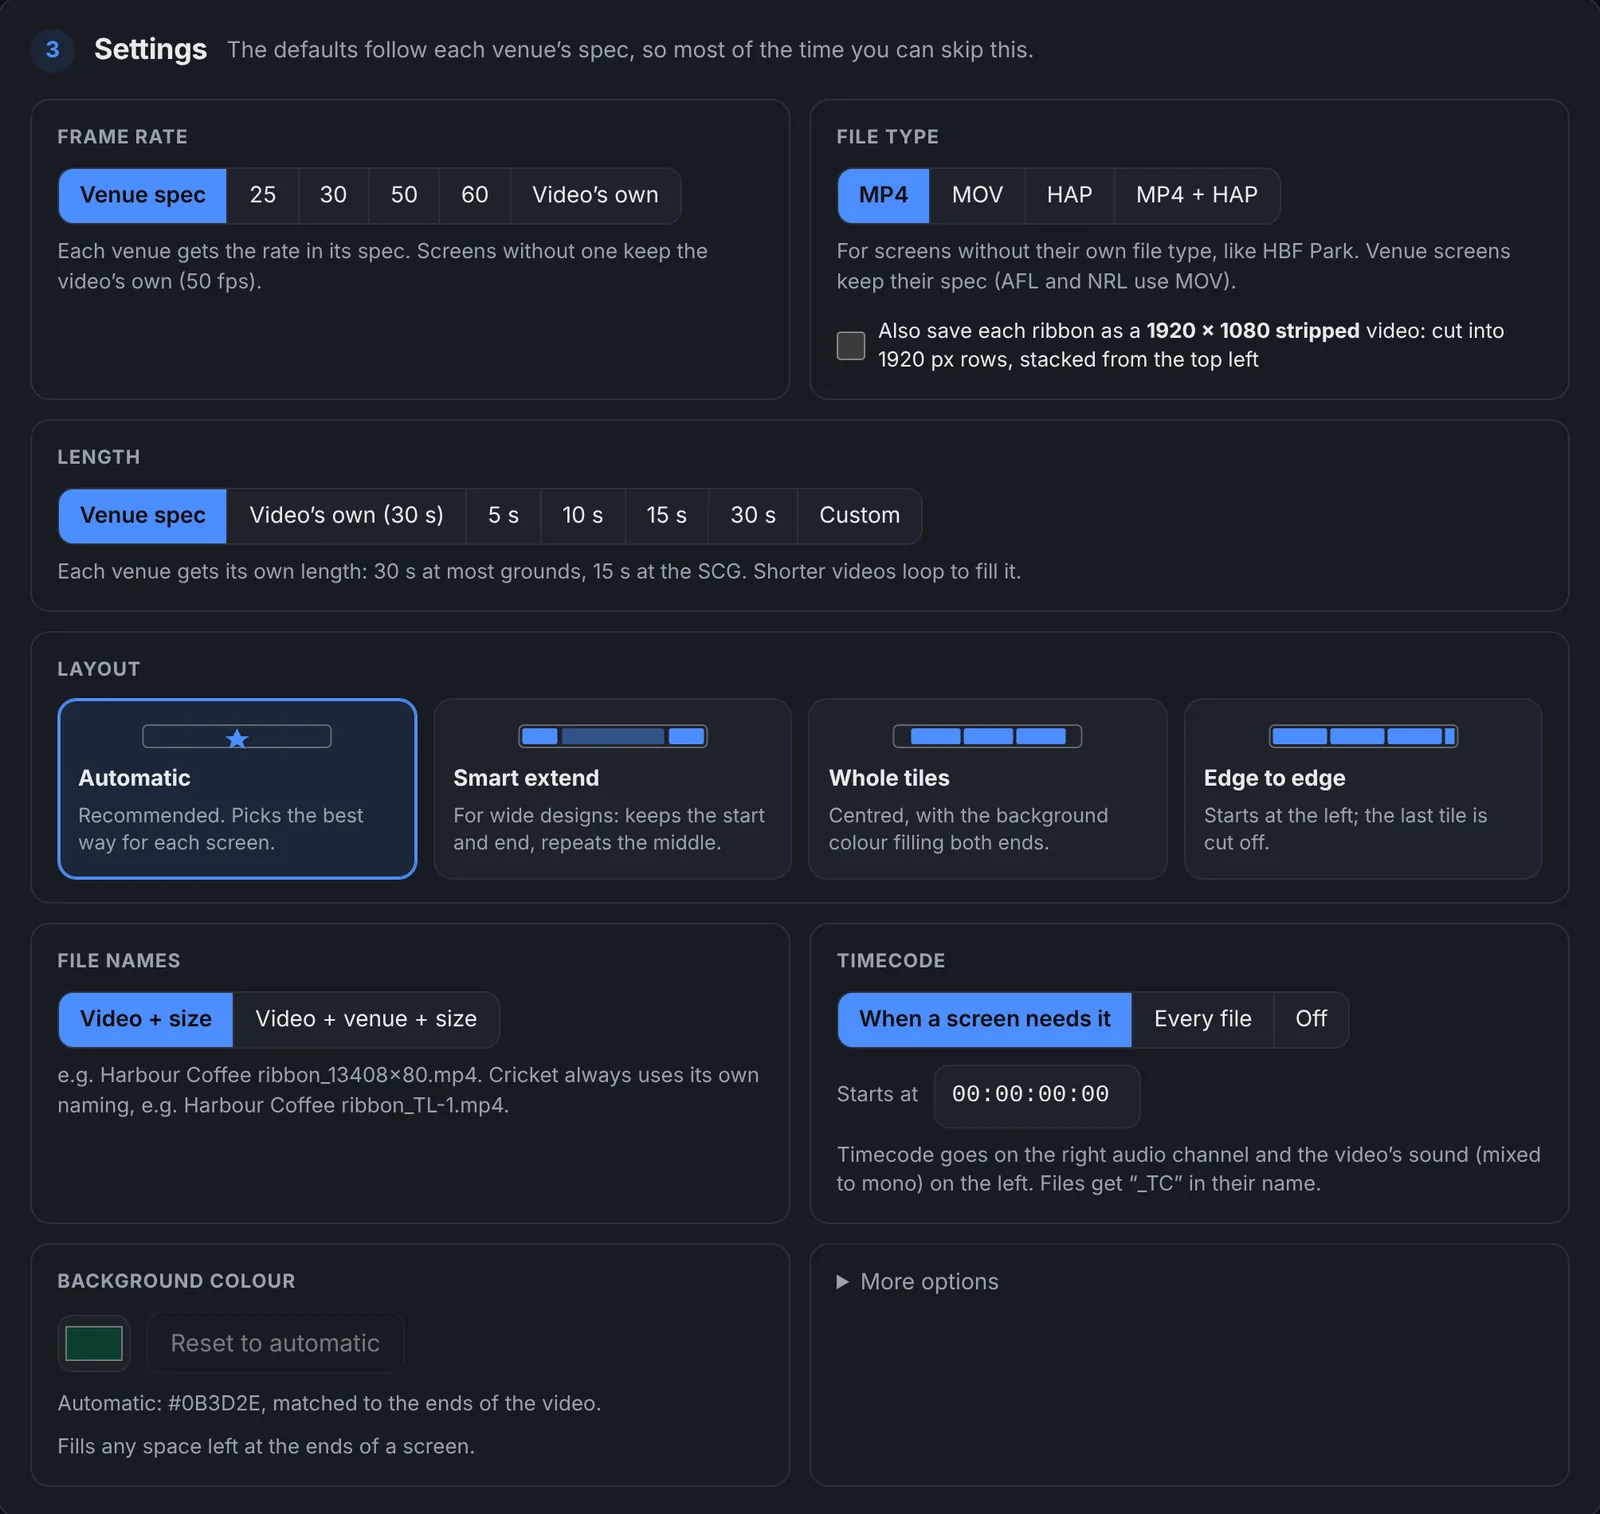
| Setting | What it does |
|---|---|
| Frame rate | Venue spec gives each screen the rate in its spec. Pick 25, 30, 50 or 60 to make every file at that rate, or Video's own to keep your video's rate. |
| File types | Tick one or more of MP4, MOV, HAP and ProRes, and each screen gets every type you've ticked. They're used for screens that don't have their own file type; venues with their own spec keep it (AFL and NRL use MOV). MP4 and MOV are H.264: when you tick both, the MP4 is the same picture as the MOV. H.264 can't be more than 16384 px wide, so wider screens need HAP or ProRes. HAP is what Daktronics recommends above 3840 px wide, but the files are big (about 300 MB per 30 seconds at 13408 px). ProRes is ProRes 422 HQ in a .mov, for venues that ask for it, like U.S. Bank Stadium; its files are about 350 MB per 30 seconds at 13408 px. |
| 1920 × 1080 stripped | Tick this to also save each ribbon cut into 1920 px rows, stacked from the top left, for systems that play ribbons that way. If the venue's pixel map (for Resolume or an LED processor) puts the ribbon part way along the first row, set First row starts to that many pixels in from the left. The ribbon then carries on from the left edge of the next row. Leave it at 0 for the usual layout. |
| Length | Venue spec gives each screen its own length: 30 seconds at most grounds, 15 at the SCG. Shorter videos loop to fill it and longer ones are trimmed. You can also pick the video's own length, 5, 10, 15 or 30 seconds, or a custom length. |
| Layout | How the video fills a screen that's a different width. See below. |
| File names | Video + size names files like Sponsor_13408x80.mp4. Video + venue + size adds the venue and screen. Cricket always uses its own names, like Sponsor_TL-1.mp4. |
| Timecode | When a screen needs it adds timecode only for screens whose spec asks for it. Every file adds it to all of them, Off to none. Timecode goes on the right audio channel and your video's sound, mixed to mono, on the left. Files with timecode get _TC in their name. You can set the start time. |
| Background colour | Fills any space left at the ends of a screen. RibbonReady matches it to the ends of your video when it loads. Pick your own colour, or click Reset to automatic to go back. |
| More options | The maximum bitrate for MP4 and MOV files, 10 Mbps unless you change it. |
Layout decides what happens when your video and the screen are different widths:
- Automatic (recommended) picks the best way for each screen.
- Smart extend is for wide designs: it keeps the start and the end of your video and repeats the middle to fill a longer screen. This is how a 7168 px design becomes a 13408 px one.
- Whole tiles repeats your video as whole tiles, centred, with the background colour filling both ends. No logo gets cut in half.
- Edge to edge starts at the left edge and repeats to the right, so the last tile is cut off.
4. Preview
The preview shows every ticked screen at true pixel size on a 1920 × 1080 frame, so what you see is exactly what the screen gets. Long ribbons are cut into 1920 px rows, with a small strip of the whole ribbon above them.
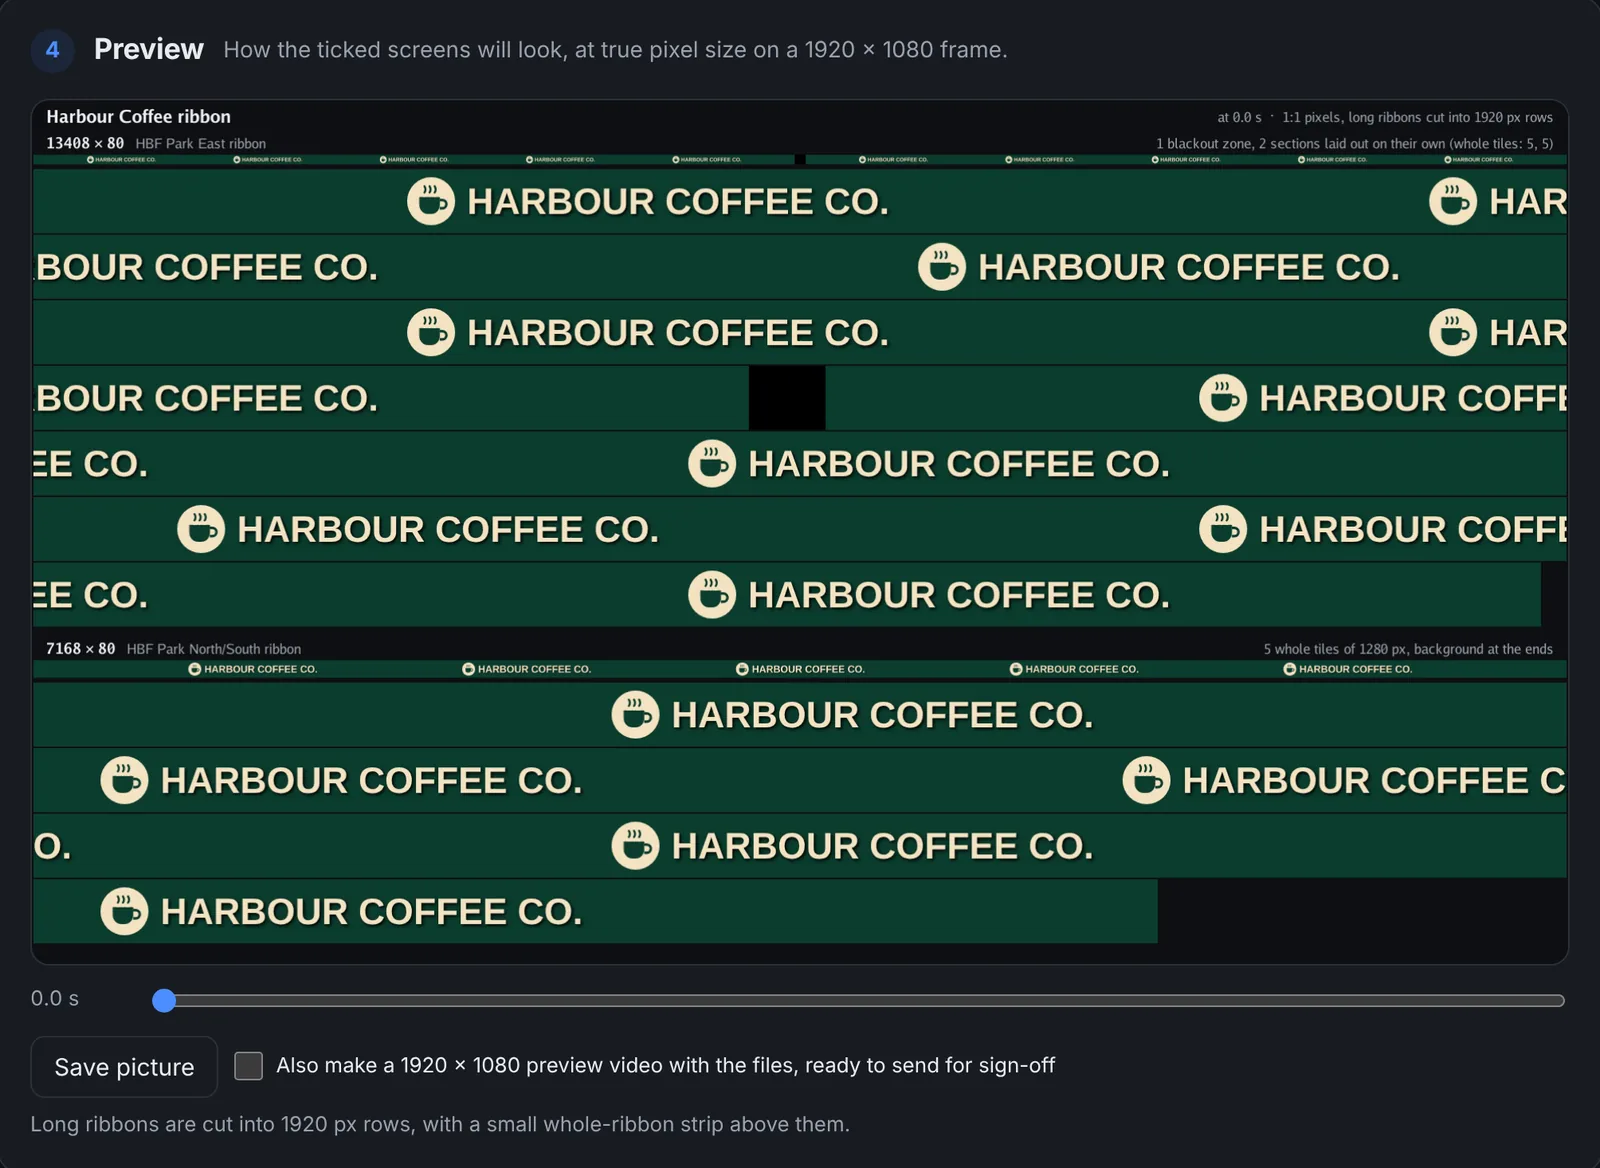
Drag the time slider to see a different moment in the video. If there are too many screens for one frame, use the arrows to page through them. Click the picture to open it full size, or Save picture to keep a copy.
Tick Also make a 1920 × 1080 preview video to get a video of the preview alongside the files, ready to send to a client or venue for sign-off.
5. Create the videos
Click Create videos at the bottom of the window. The button says how many files it will make, for example Create 4 videos. A progress bar shows how far along it is, how long it's taken and roughly how long is left. Click Cancel to stop.

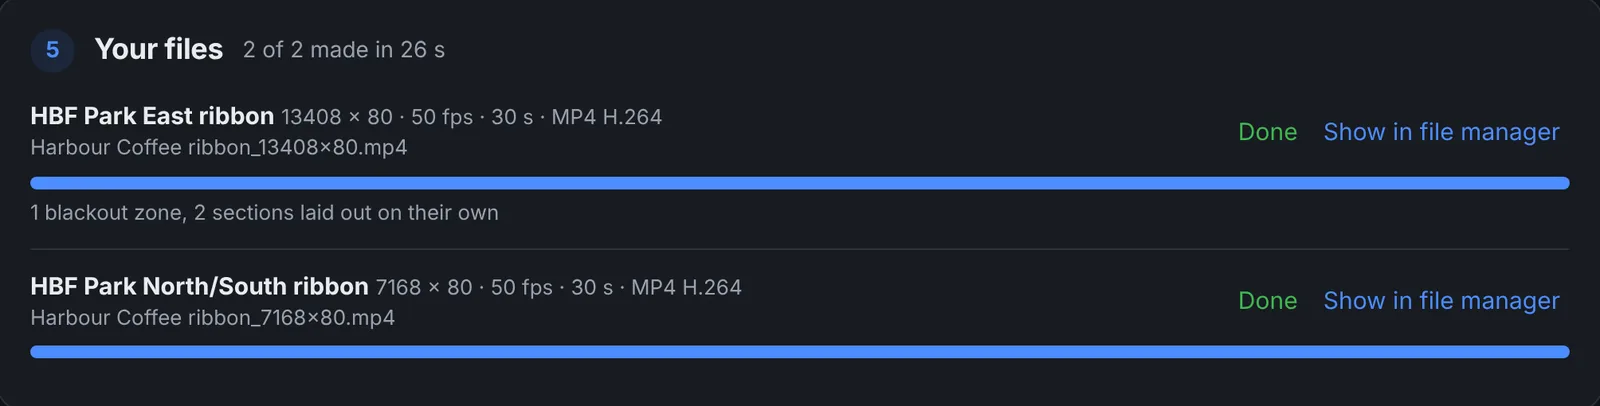
When they're done, Your files lists every file with its size and spec. Click Show in Finder (or Show in Explorer on Windows) to open the folder.
Your screen list
RibbonReady comes with the ribbons at Australian A-League, AFL, NRL, NBL and cricket venues, and at American stadiums and arenas, and you can change the list to suit the screens you work with. Click Edit list in step 2. Each screen shows its league, venue, screen name, width and height. You can also give it its own frame rate, length and file type, use it only for scrolling or only for non-scrolling videos, add timecode, and set the end of its file name (like TL-1). Leave a field on its setting to use whatever step 3 says.
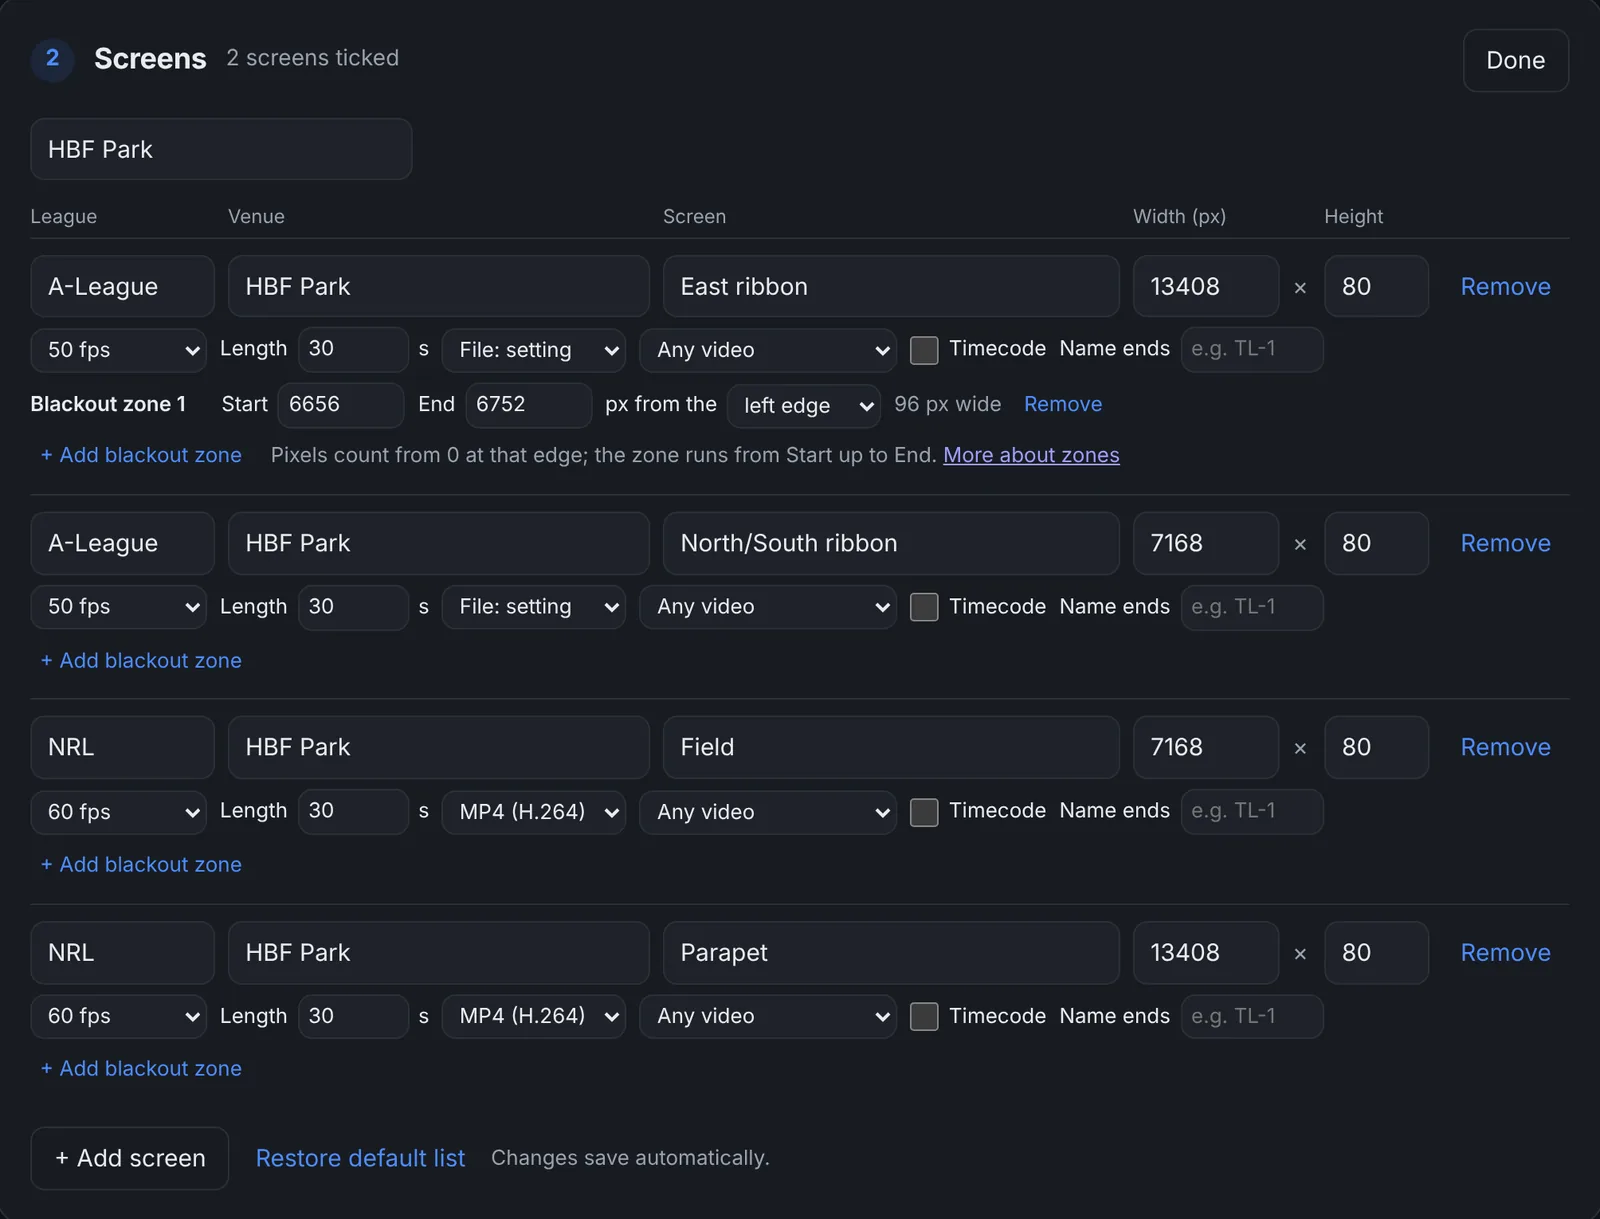
- Click + Add screen to add one of your own.
- Click Remove to take a screen off your list.
- Click Restore default list to go back to the list RibbonReady came with.
- Changes save automatically. Click Done when you've finished.
Custom sizes
The Custom sizes tab has three slots for one-off sizes, made at the same time as the venues you tick. Tick a slot, enter the width and height, and optionally a name, frame rate, length and file type. Leave frame rate or length on Setting to use the settings in step 3.
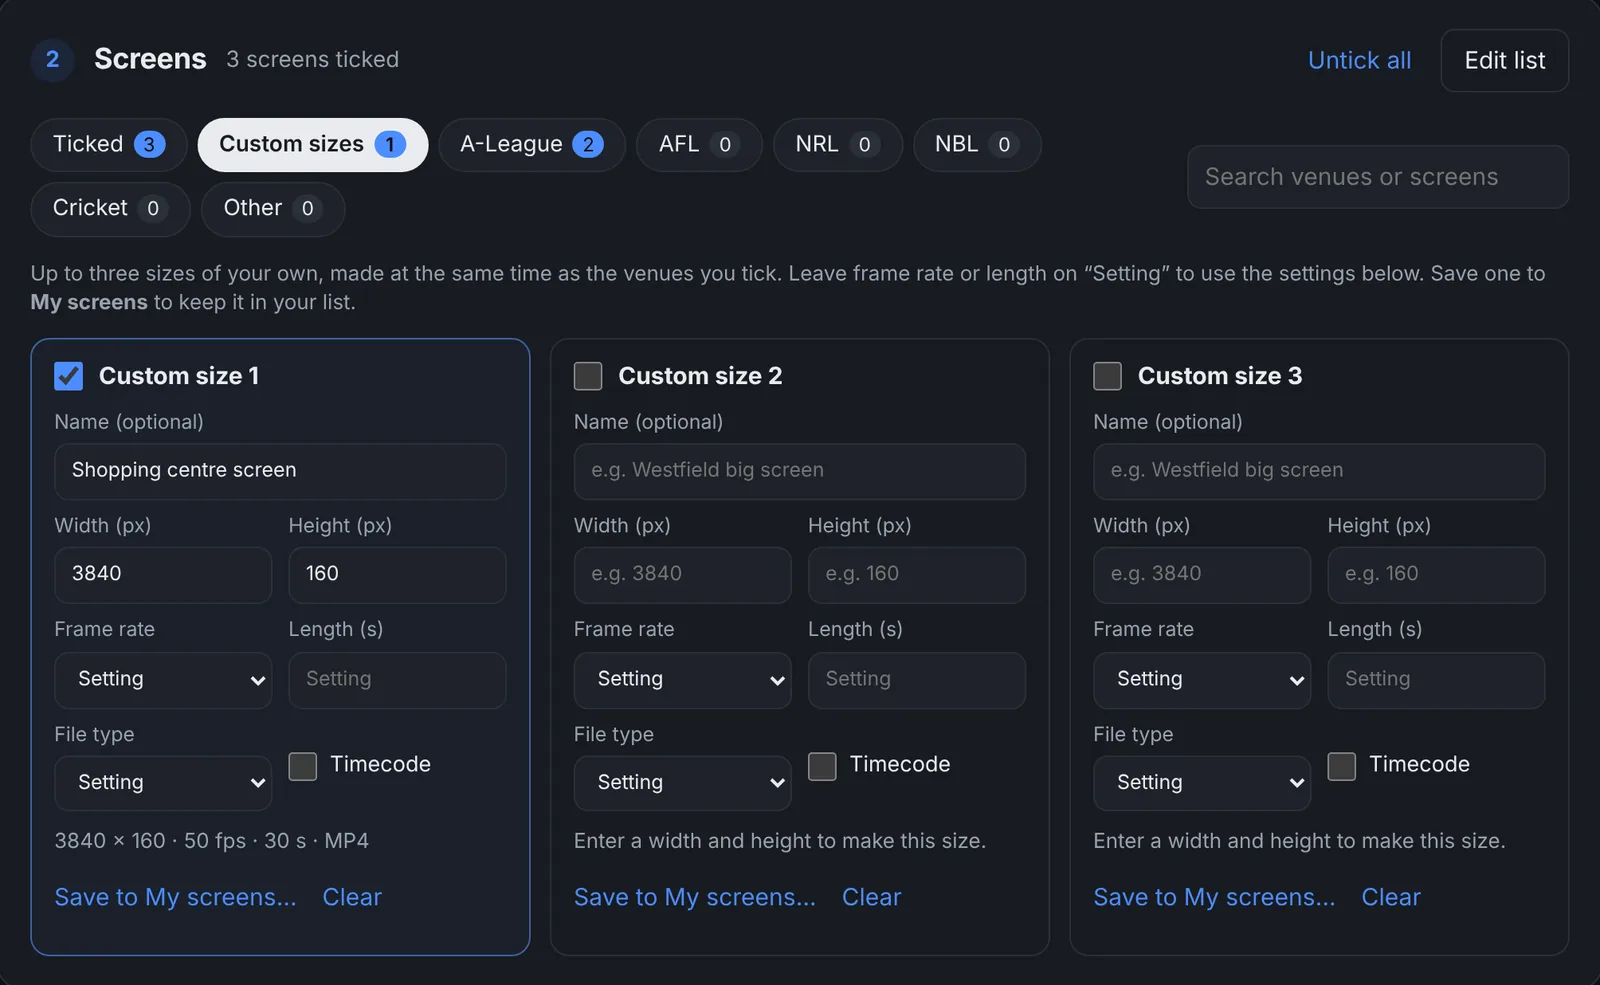
Click Save to My screens… to keep a custom size in your list under My screens. You can also send it to us to consider adding for everyone: it sends the size and spec with your licence name.
When the venue list changes
We keep the venue list up to date as screens change. RibbonReady picks up the new list the next time it's online and shows a note above your screens saying what changed. Your ticks, your own screens and any blackout zones you added yourself stay as they are. If you changed one of a venue's own screens, the list's spec for that screen comes back with the update.
Know a screen that isn't in the list? Send us the venue's specs and we'll add it.
Blackout zones
Some ribbons have a physical gap in the middle: a bench between two boards, a break in a parapet, a camera position. A blackout zone tells RibbonReady where that gap is, so nothing important lands in it. The zone itself comes out black.
Adding a zone
You can add zones in two places: in Edit list (each screen has + Add blackout zone), or in the Designer under On the ticked screens. Each zone has:
- Start, the first pixel of the gap.
- End, the pixel just after the gap. The zone runs from Start up to End.
- px from the left edge or right edge, which edge you're counting from. Pixels count from 0 at that edge.
For example, on a 13408 px ribbon with a 96 px gap starting 6656 px from the left, enter Start 6656, End 6752, from the left edge. A gap in the last 120 px of the right-hand end would be Start 0, End 120, from the right edge. Counting from the right is handy when you've measured from that end of the stand.
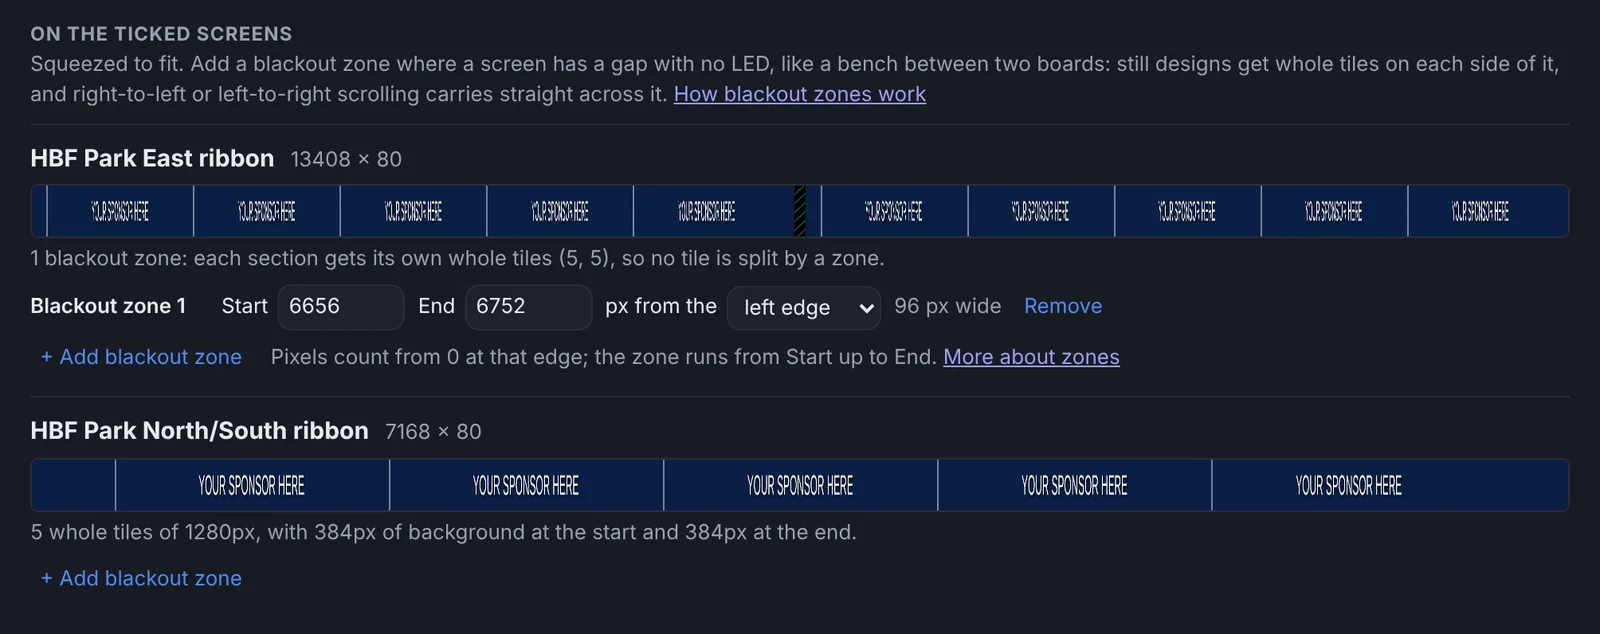
A screen can have as many zones as it needs. Click + Add blackout zone again for each gap. If a zone runs past the end of the screen, has no width or covers the whole screen, RibbonReady says so next to it.
How the layout works around a zone
- Still designs, and designs that scroll up or down: each LED section between the zones gets its own whole tiles, centred, so no logo is ever split by a gap.
- Designs that scroll sideways: the video is laid out as if the sections touched, then cut at each zone. The scroll carries straight across the gap, as if the board continued behind the bench.
The layout strips in the Ticked tab and the Designer show the zones striped in black, with a note saying how each screen was laid out, for example each section gets its own whole tiles (5, 5).
Full-length files
Some venues also take each ribbon whole, the way their own playback tool puts it together from the tiles. At Optus Stadium those are the "360" files: the whole field, 34,344 × 108, and the whole parapet, 25,152 × 48. They're wider than MP4 or MOV can go, so they're delivered striped: the ribbon is cut into rows, one under the other, as 14,868 × 324 for the field (3 rows) and 15,144 × 96 for the parapet (2 rows). Every part of RibbonReady can make them.
- Field 360: 11 field tiles side by side, centred, with 1 px of background at each end.
- Parapet 360: the two non-scrolling parapet tiles (1380 and 1764) take turns, 8 of each. The first and last 156 px of the parapet aren't seen, so keep anything important out of them.
- Parapet 360 (scrolling): the scrolling parapet tile (1350) repeated from the start. The last one is cut off at the end.
In the converter, the full-length files are listed under the venue's screens, in the league tab. Tick one and the tile screens it's made from are ticked too. They're made after the tiles, from the tile files, and saved next to your video, named like Bank_FIELD360_STRIPED_14868x324.mp4. The Field 360 can be made from a still or a scrolling video, the Parapet 360 from a still one and the Parapet 360 (scrolling) from a scrolling one. If a tile it needs isn't ticked, the screen list and the bar at the bottom say which one.
In the Designer, On the ticked screens has the same tick boxes under the venue's screens. The converter makes the ticked ones when you create the videos.
In Batch, tick Also make the full-length files. See Full-length files in Batch.
In Test pattern, the full-length files are listed with the venue's screens. Their pattern is drawn along the whole ribbon, so the pixel ruler counts from one end to the other, the white bar sweeps the whole length, and every module has its own number. Then it's striped into rows the way the venue asks, for example Module map 20x20_FIELD360_STRIPED_14868x324.mp4. The parapet and the scrolling parapet are the same size, so they share one file.
The Designer
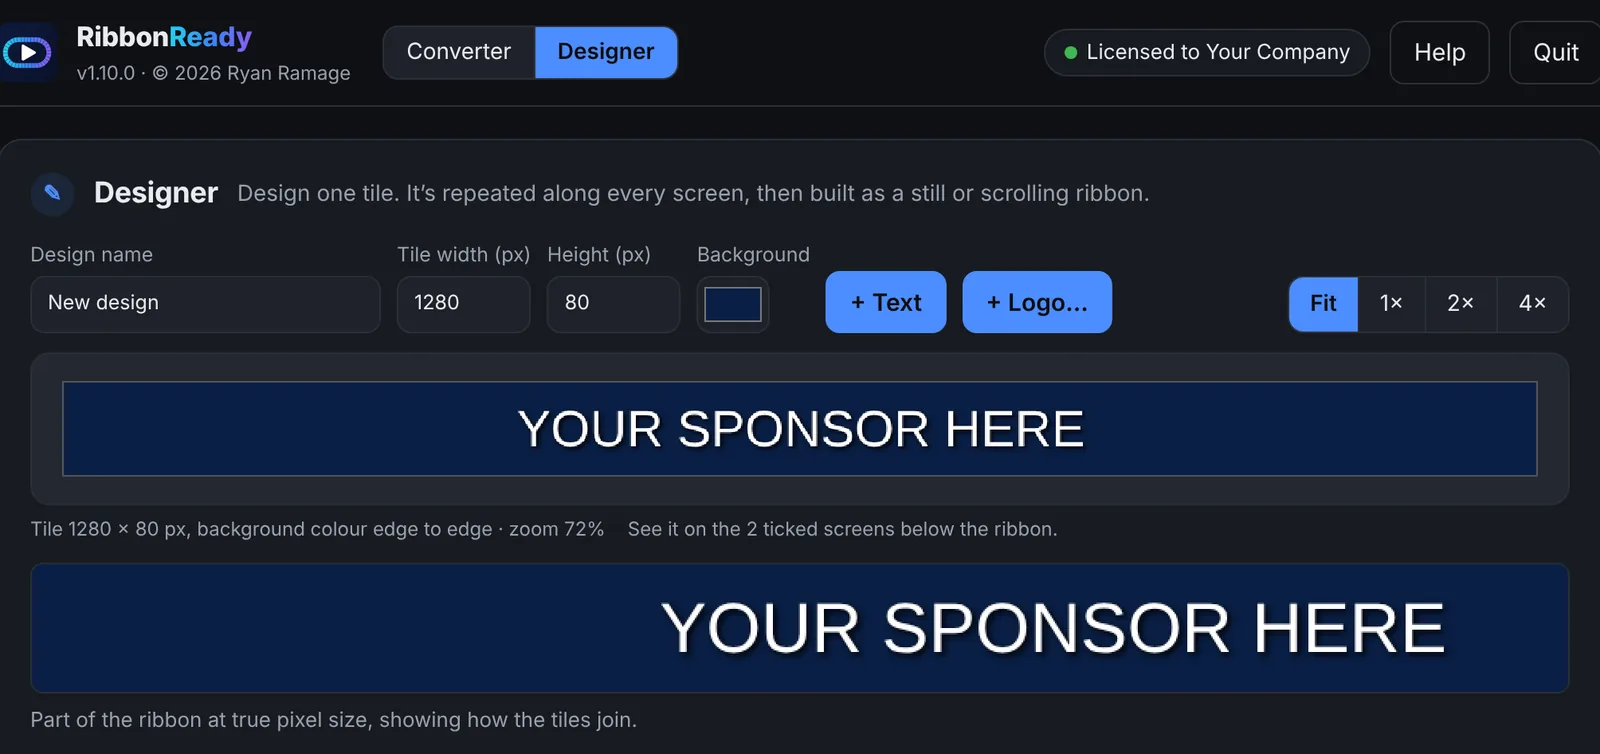
The Designer is for making a sponsor tile from a logo and some text, without opening another program. You design one tile, and RibbonReady repeats it along every screen and builds it as a still or scrolling ribbon. Click Designer at the top of the app.
Designing a tile
- Give it a Design name, usually the sponsor's name. It's used for the folder and file names.
- Set the Tile width and Height in pixels. 80 px high suits most ribbons; the tile width sets how often it repeats.
- Pick a Background colour. For a gradient, set Fill to Gradient, top to bottom or Gradient, left to right and pick the colour it Fades to. Where a screen has background at its ends, a gradient carries on into them instead of meeting a flat colour.
- Click + Text to add text, or + Logo… to add a picture (PNG, JPEG, SVG, WebP or GIF). A PNG or SVG with a transparent background works best.
Drag anything on the canvas to move it. It snaps to the centre and to the top and bottom edges; hold Alt (Option on a Mac) to move it freely. Drag its corner to resize it. Use the arrow keys to nudge it 1 px at a time, or hold Shift for 10 px. Press Delete to remove it. Fit, 1×, 2× and 4× zoom the canvas.
Under the canvas, the ribbon strip shows part of the ribbon at true pixel size, so you can see how the tiles join.
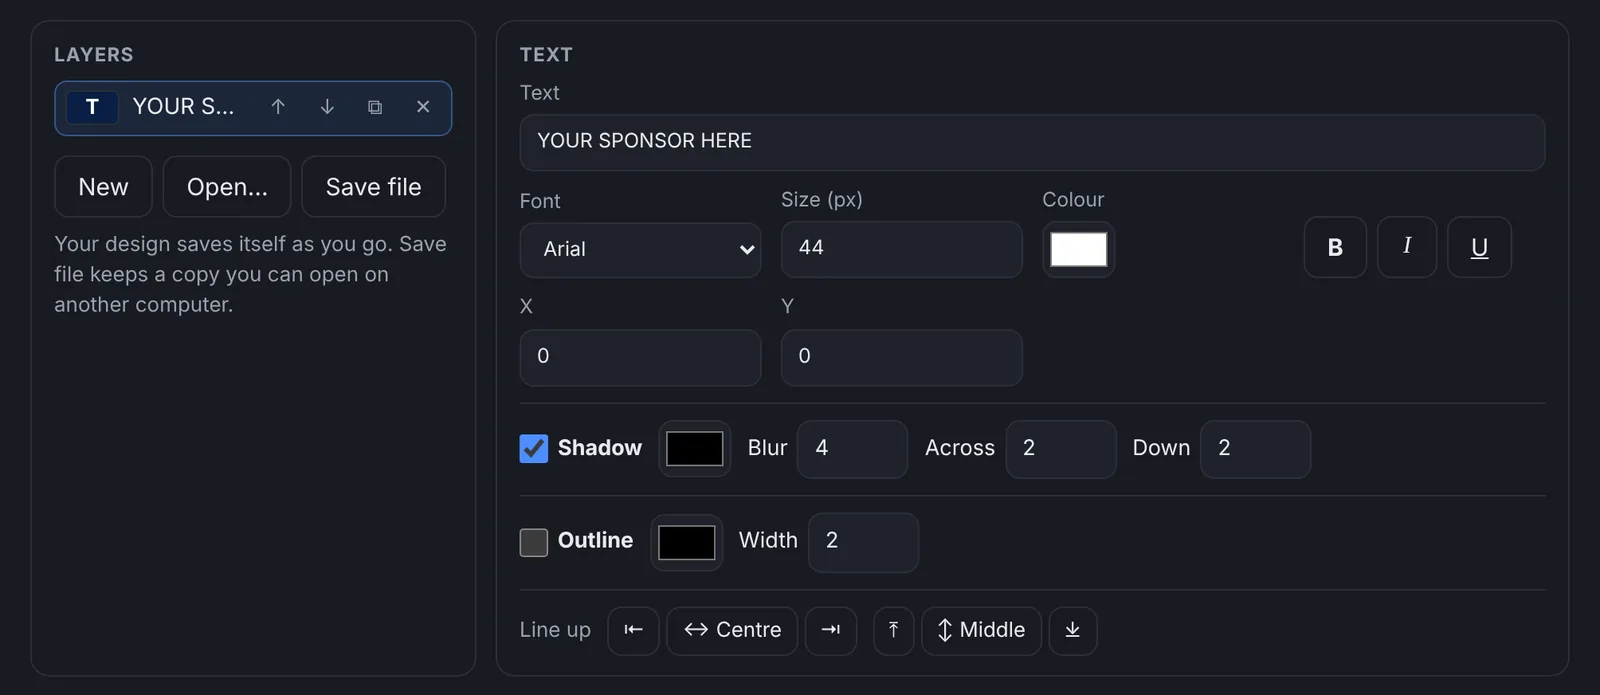
Layers lists everything in the tile. Click one to select it. The buttons move it forward or back, duplicate it or delete it.
Properties changes the selected item:
- Text: the words, font, size, colour, bold, italic and underline, plus an optional Shadow and Outline. The font list shows the fonts installed on your computer; choose Other installed font… for one that isn't listed.
- Logo: position and size. Keep its shape stops it stretching. Fill the height makes it as tall as the tile, and Height with 8% margin leaves a little room above and below.
- The line-up buttons centre it across or down the tile, or push it to an edge.
Your design saves itself as you go. Save file keeps a copy you can open on another computer with Open…, and New starts again.
Seeing it on the screens
On the ticked screens draws your tile on every screen you've ticked in the converter, squeezed to fit the window, with a note saying how it fits, for example 5 whole tiles of 1280px, with 384px of background at the start and 384px at the end. This is also where you can add blackout zones.
Building it
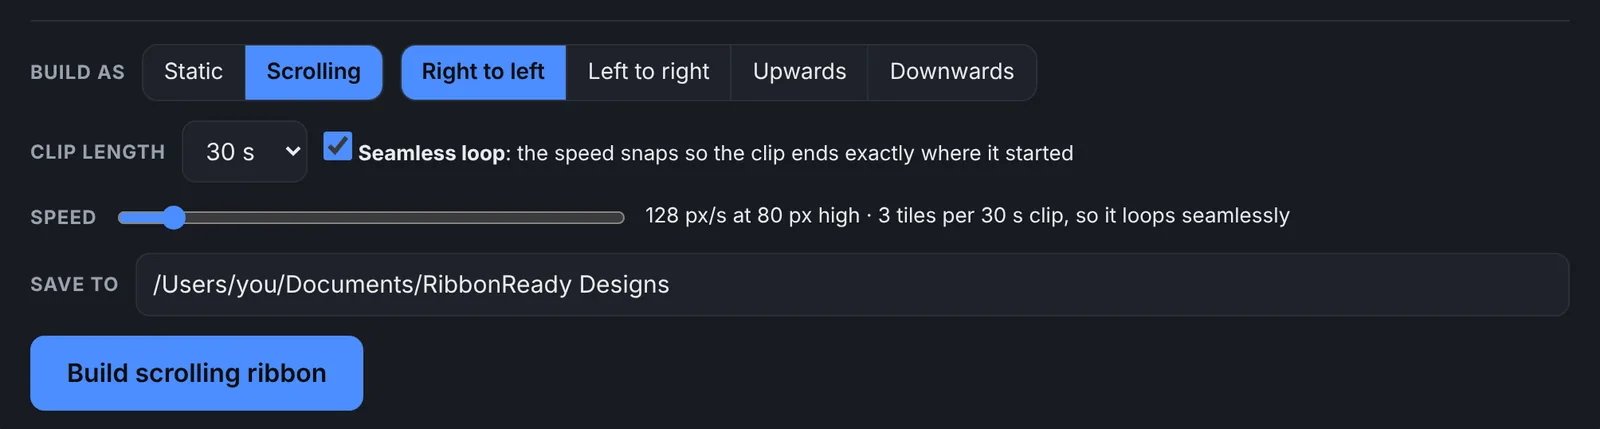
Choose Build as:
- Static makes a still tile. Each screen gets whole tiles, centred.
- Scrolling makes it move Right to left, Left to right, Upwards or Downwards. Set the Clip length (5 to 120 seconds) and the Speed. With Seamless loop ticked, the speed snaps so the clip ends exactly where it started, so it loops without a jump.
- Names list scrolls a list of names along the whole ribbon, see Names scroller.
Files to make has the same MP4, MOV, HAP and ProRes tick boxes as the converter's File types, plus 1920 × 1080 stripped too, so you can choose them before you build. They carry straight over to the converter.
Save to is the folder the design goes in, which starts as Documents/RibbonReady Designs. Click Build static ribbon or Build scrolling ribbon. RibbonReady saves the tile, the design and its clip in a folder named after the design, then loads the clip into step 1 of the converter with the right content and length already set. Check the preview and click Create videos.
Names scroller
For a thank-you to volunteers, members or donors: every name in a list scrolls right to left along the full length of the ribbon, with your logo between each name.
- Design the tile as usual, with one text layer for the names and a logo (or anything else) beside it. The text layer's words are just a sample: the names take its font, size, colour, shadow and outline, and sit on the same line.
- Set Build as to Names list.
- Type or paste the names, one per line, or click Load names… to load a file (the kinds of file it reads are listed below).
- Names look like picks the text layer the names copy. With Put the rest of the tile between the names ticked, everything else in the tile (logos, other text) goes between each name; untick it for names only. Space is the gap between each name and the logo.
- Plays: Round and round loops seamlessly, so the first name comes round again after the last and the clip can play all night. Once through starts and ends with an empty ribbon, like film credits.
- Set the Speed. The note under it says how long each name is on the ribbon and how long the clip is (up to 60 minutes).
Click Build names scroller. The clip is as wide as the widest screen you've ticked, so the names travel its whole length. Narrower screens show the middle of the same scroll, and blackout zones are carried straight across. A long list takes a few minutes to build: the button shows how far it's got, and Stop cancels it. It saves the names list next to the clip, then loads it into the converter with Scrolling content and the clip's own length set.
Names files that Load names… reads:
- Text (.txt): one name per line.
- CSV or TSV (.csv, .tsv, from Excel with Save As › CSV): a column headed Name or Full name, or First name and Last name columns. Without a heading, the first column.
- XML (.xml): elements or attributes called name, or firstName and lastName inside each person.
- JSON (.json): a list of names, or of people with a name (or first and last name).
Batch convert
Batch convert is for ribbon files that are already made, for example renders from After Effects for each screen at a venue. It checks them against the venue's spec and makes every file type you need in one go. Click Batch at the top of the app.
- Pick the Venue. The screens at that venue are listed with their spec (size, frame rate, length and file type), and, once you add videos, which video each screen gets.
- Click Add videos… and choose your files. You can choose several at once, and add more later. You can also paste a file's path and click Add.
- Under Files to make, tick MP4, MOV, HAP and ProRes in any mix, and 1920 × 1080 stripped too if you need it. These are the same as the converter's settings. Every screen gets the types you tick, even where the venue's spec names one. HAP is left out for a screen whose width or height doesn't divide by 4, and MP4 and MOV for a screen wider than 16,384 px (HAP and ProRes can go wider); the note under the button says which.
- Click Make the files. Progress shows at the bottom of the window, and each video's files are listed under Your files.
Each video is matched to the venue's screens by its size, then checked:
- Meets the spec (green): it's the right size, frame rate and length. It's ticked, ready to make.
- Doesn't meet the spec (amber): it's the right size, but the frame rate or length is off, and the list says how. It's left unticked. Tick it to make it anyway, at the venue's frame rate and length (shorter videos loop, longer ones are trimmed).
- Red: the video isn't the size of any screen at this venue, or it can't be read. A video that can't be read can't be ticked. One that's simply another size can still be made for this venue, see below.
The new files go in a folder named after the venue, next to each video, for example HBF Park A-League/Club Ad_13408x80.mp4. A size already at the end of a file's name isn't added twice. Videos that are the screen's size are used as they are: no tiling, smart extend or blackout zones, because they're already made for the screen.
Make it for another venue's screens
A video made for somewhere else, like an HBF Park 13408 ribbon you want on Optus Stadium, shows Make it for with the venue's screens. Tick one or more. It's laid out for each screen the way the converter's Automatic layout does it (whole tiles or smart extend, with the venue's blackout zones), at the screen's frame rate and length. A scrolling video lists only the venue's scrolling screens, and a still one only the screens for stills.
Full-length files in Batch
Batch can put a venue's full-length files together from tile files you already have. Tick Also make the full-length files and add each sponsor's tile files, named the same apart from the size or tile, for example Bank_3122x108.mov, Bank_1380x48.mov and Bank_1764x48.mov (or Bank_Field.mov, Bank_Parapet_A.mov and Bank_Parapet_B.mov). The panel lists each full-length file that will be made, and from which tiles. They're made after the tiles, in the same folder, named like Bank_FIELD360_STRIPED_14868x324.mov.
A video converted with Make it for counts too, so one HBF Park ribbon can make Optus Stadium's tiles and full-length files in one go.
Test patterns
Test patterns are clips for checking a ribbon before match day: that every LED works, and that the modules are mapped in the right order. They're made from nothing, at each screen's own size and frame rate. Click Test pattern at the top of the app.
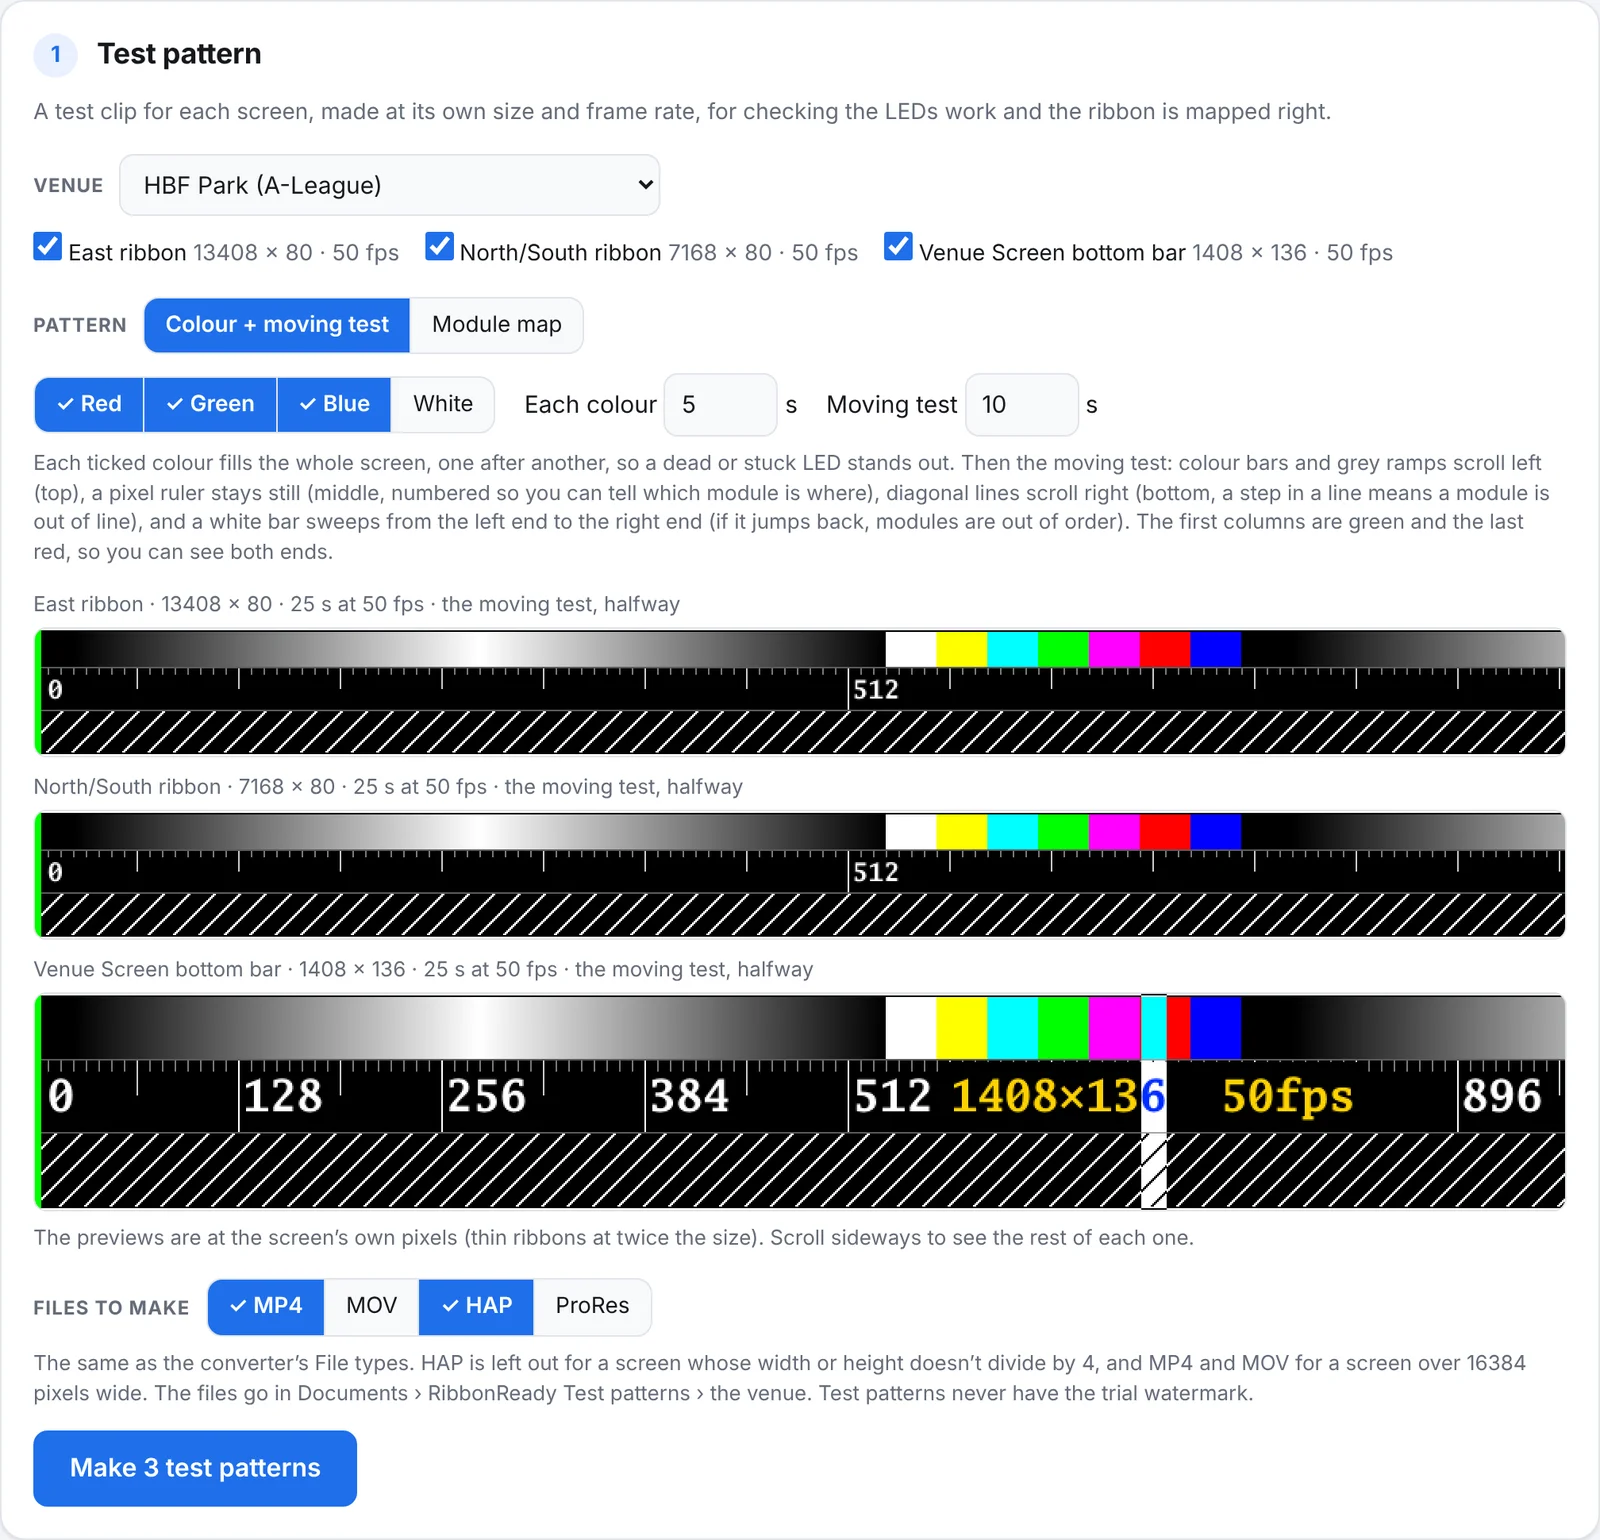
- Pick the Venue. Its screens are listed and all ticked. Untick any you don't need. Screens the same size share one file. At Optus Stadium the full-length files are listed too.
- Pick the Pattern: Colour + moving test or Module map (both are explained below).
- Under Files to make, tick the file types you need. These are the same as the converter's. HAP is left out for a screen whose width or height doesn't divide by 4.
- Click Make the test pattern. Progress shows at the bottom of the window, and the files are listed under Your files.
A preview of each screen's pattern is shown above Files to make, at the screen's own pixels (thin ribbons at twice the size). Scroll sideways to see the rest of it. The files go in Documents/RibbonReady Test patterns/ in a folder named after the venue, for example HBF Park A-League/Test pattern_13408x80.mp4. Test patterns never have the trial watermark, because it would hide the LEDs you're testing.
Colour + moving test
Each ticked colour (Red, Green, Blue, and White if you want it) fills the whole screen for the seconds in Each colour, one after another. A dead or stuck LED stands out against a solid colour. The moving test then runs for the seconds in Moving test. The default is 5 s of each colour and 10 s of moving test, 25 s in all.
The moving test has three strips:
- Top: colour bars and smooth grey ramps scroll to the left. Look for LEDs that stay dark or show the wrong colour, and for steps in the grey ramps.
- Middle: a pixel ruler that stays still, with a tick every 8 px and a number every 512 px (every 128 px on short ribbons). It shows the screen's size in the middle and END with the width at the right. If a number is in the wrong place, the module there is mapped wrong.
- Bottom: diagonal lines scroll to the right. A step or break in a line means a module is out of line with the one next to it.
On top of that, a white bar sweeps from the left end to the right end over the moving test. If it jumps or goes backwards, modules are in the wrong order. The first columns are green and the last columns are red, so you can check both ends of the ribbon are showing.
Module map
Enter the size of one LED module in pixels, for example 80 × 80. The screen is cut into modules of that size, starting at the top left, like the test cards in pixel-mapping software. Each module is:
- outlined on its own edges, so the join between two modules shows as a double line
- crossed corner to corner
- numbered left to right, then top to bottom
- coloured red, green or blue, never the same as the modules beside it, above or below
A label in the middle gives the screen's size and the module size. If the screen isn't a whole number of modules wide or high, the last column or bottom row is cut off, as it is on the real screen. The module map lasts each screen's own length, or the seconds you enter in Length.
Licences and the free trial
Click the licence button at the top of the app to see your licence: who it's licensed to, the key, when it expires and when it next checks in online. RibbonReady keeps working offline between checks.
- Check now checks your licence straight away, for example after you renew.
- Deactivate this computer frees up your licence to use on another computer. You can move a licence to another computer once per billing period, and you'll need your key to use the app here again. If a computer breaks or is replaced, email create@getribbonready.com and we'll move it for you.
- Manage your subscription opens your billing page, where you can change your card, see invoices or cancel.
During the free trial, a bar at the top says how long is left, with Enter licence key and Buy a licence. Entering a key removes the watermark from new files straight away.
Updates
RibbonReady checks for new versions when it's online and downloads them in the background. When one is ready, a button at the top says, for example, Update 1.10.1 ready · Restart. Click it to install the update now, or leave it and it installs the next time you open RibbonReady. It never installs while videos are being made.

Hover over the button to see what's new. After the update, the button says which version you're on, and clicking it hides it.
Troubleshooting
My Mac says Apple could not verify RibbonReady
That's expected the first time. Follow step 3 of Install on a Mac, or see this answer.
The update won't install on my Mac
Move RibbonReady into your Applications folder and open it from there. Updates can't install while it runs from Downloads or another folder.
A screen warning says my video doesn't match
The check in step 1 compares your video with the specs of the ticked screens. A frame rate or length setting that differs from the spec is easy to fix: choose Venue spec under Frame rate or Length. If the video is shorter than the screen is tall, it's enlarged to fit and may look soft, so ask for a version made at the screen's height. If the video is longer than the files, the end is cut off.
Logos are cut in half on a screen
Set Layout to Whole tiles, or Automatic, which uses whole tiles when it can. If the screen has a physical gap, add a blackout zone so tiles land on each side of it.
Getting help
If something goes wrong, or you have a question, click Help › Send to support. You'll also find Send to support on every error message and in the Diagnostics panel at the bottom of the app.
- Write what you were doing and what happened.
- Enter your email for our reply. If RibbonReady is activated, you can leave it blank and we'll reply to the email on your licence.
- Click Send. You'll get a reference number, and we'll reply by email.
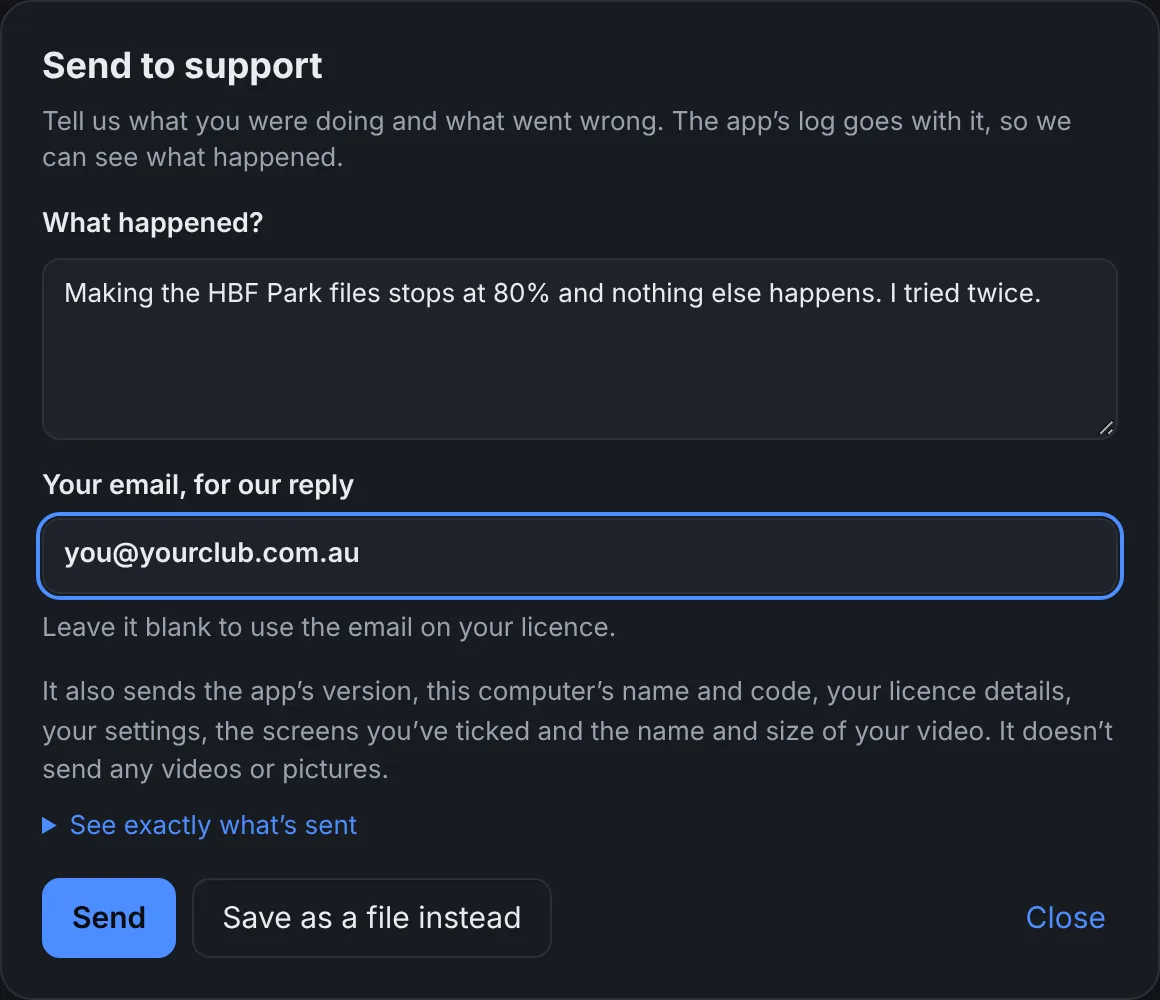
It sends the app's log of what it did this time and the time before, the app's version, your computer's name and code, your licence details, your settings, the screens you've ticked and the name and size of your video. It never sends videos or pictures. Click See exactly what's sent to read the whole thing first.
Still stuck? Email create@getribbonready.com and tell us what you were trying to do.